Food Fundamentals: Perfect Creamy Scrambled Eggs
I used to think that scrambled eggs sucked. It just turned out that I was eating the wrong kind of scrambled eggs. I had the eggs at breakfast buffets, diners and cheap breakfast joints, and…McDonald’s. They were always either much too hard, rubbery, over-browned, greasy, what name you. I know many people like those kinds of scrambled eggs (to each their own) but that just wasn’t for me. I thought I was strange because I didn’t like to have scrambled eggs at breakfast, while everyone else gobbled theirs up, often smothered in ketchup (I don’t like ketchup either). Truth be told, I wasn’t really much of an egg fan, in any form (sunny-side-up, poached, hardboiled, softboiled, etc.), but it seemed like everyone liked scrambled eggs. I have now grown to appreciate most egg preparations, especially those with runny yolks.
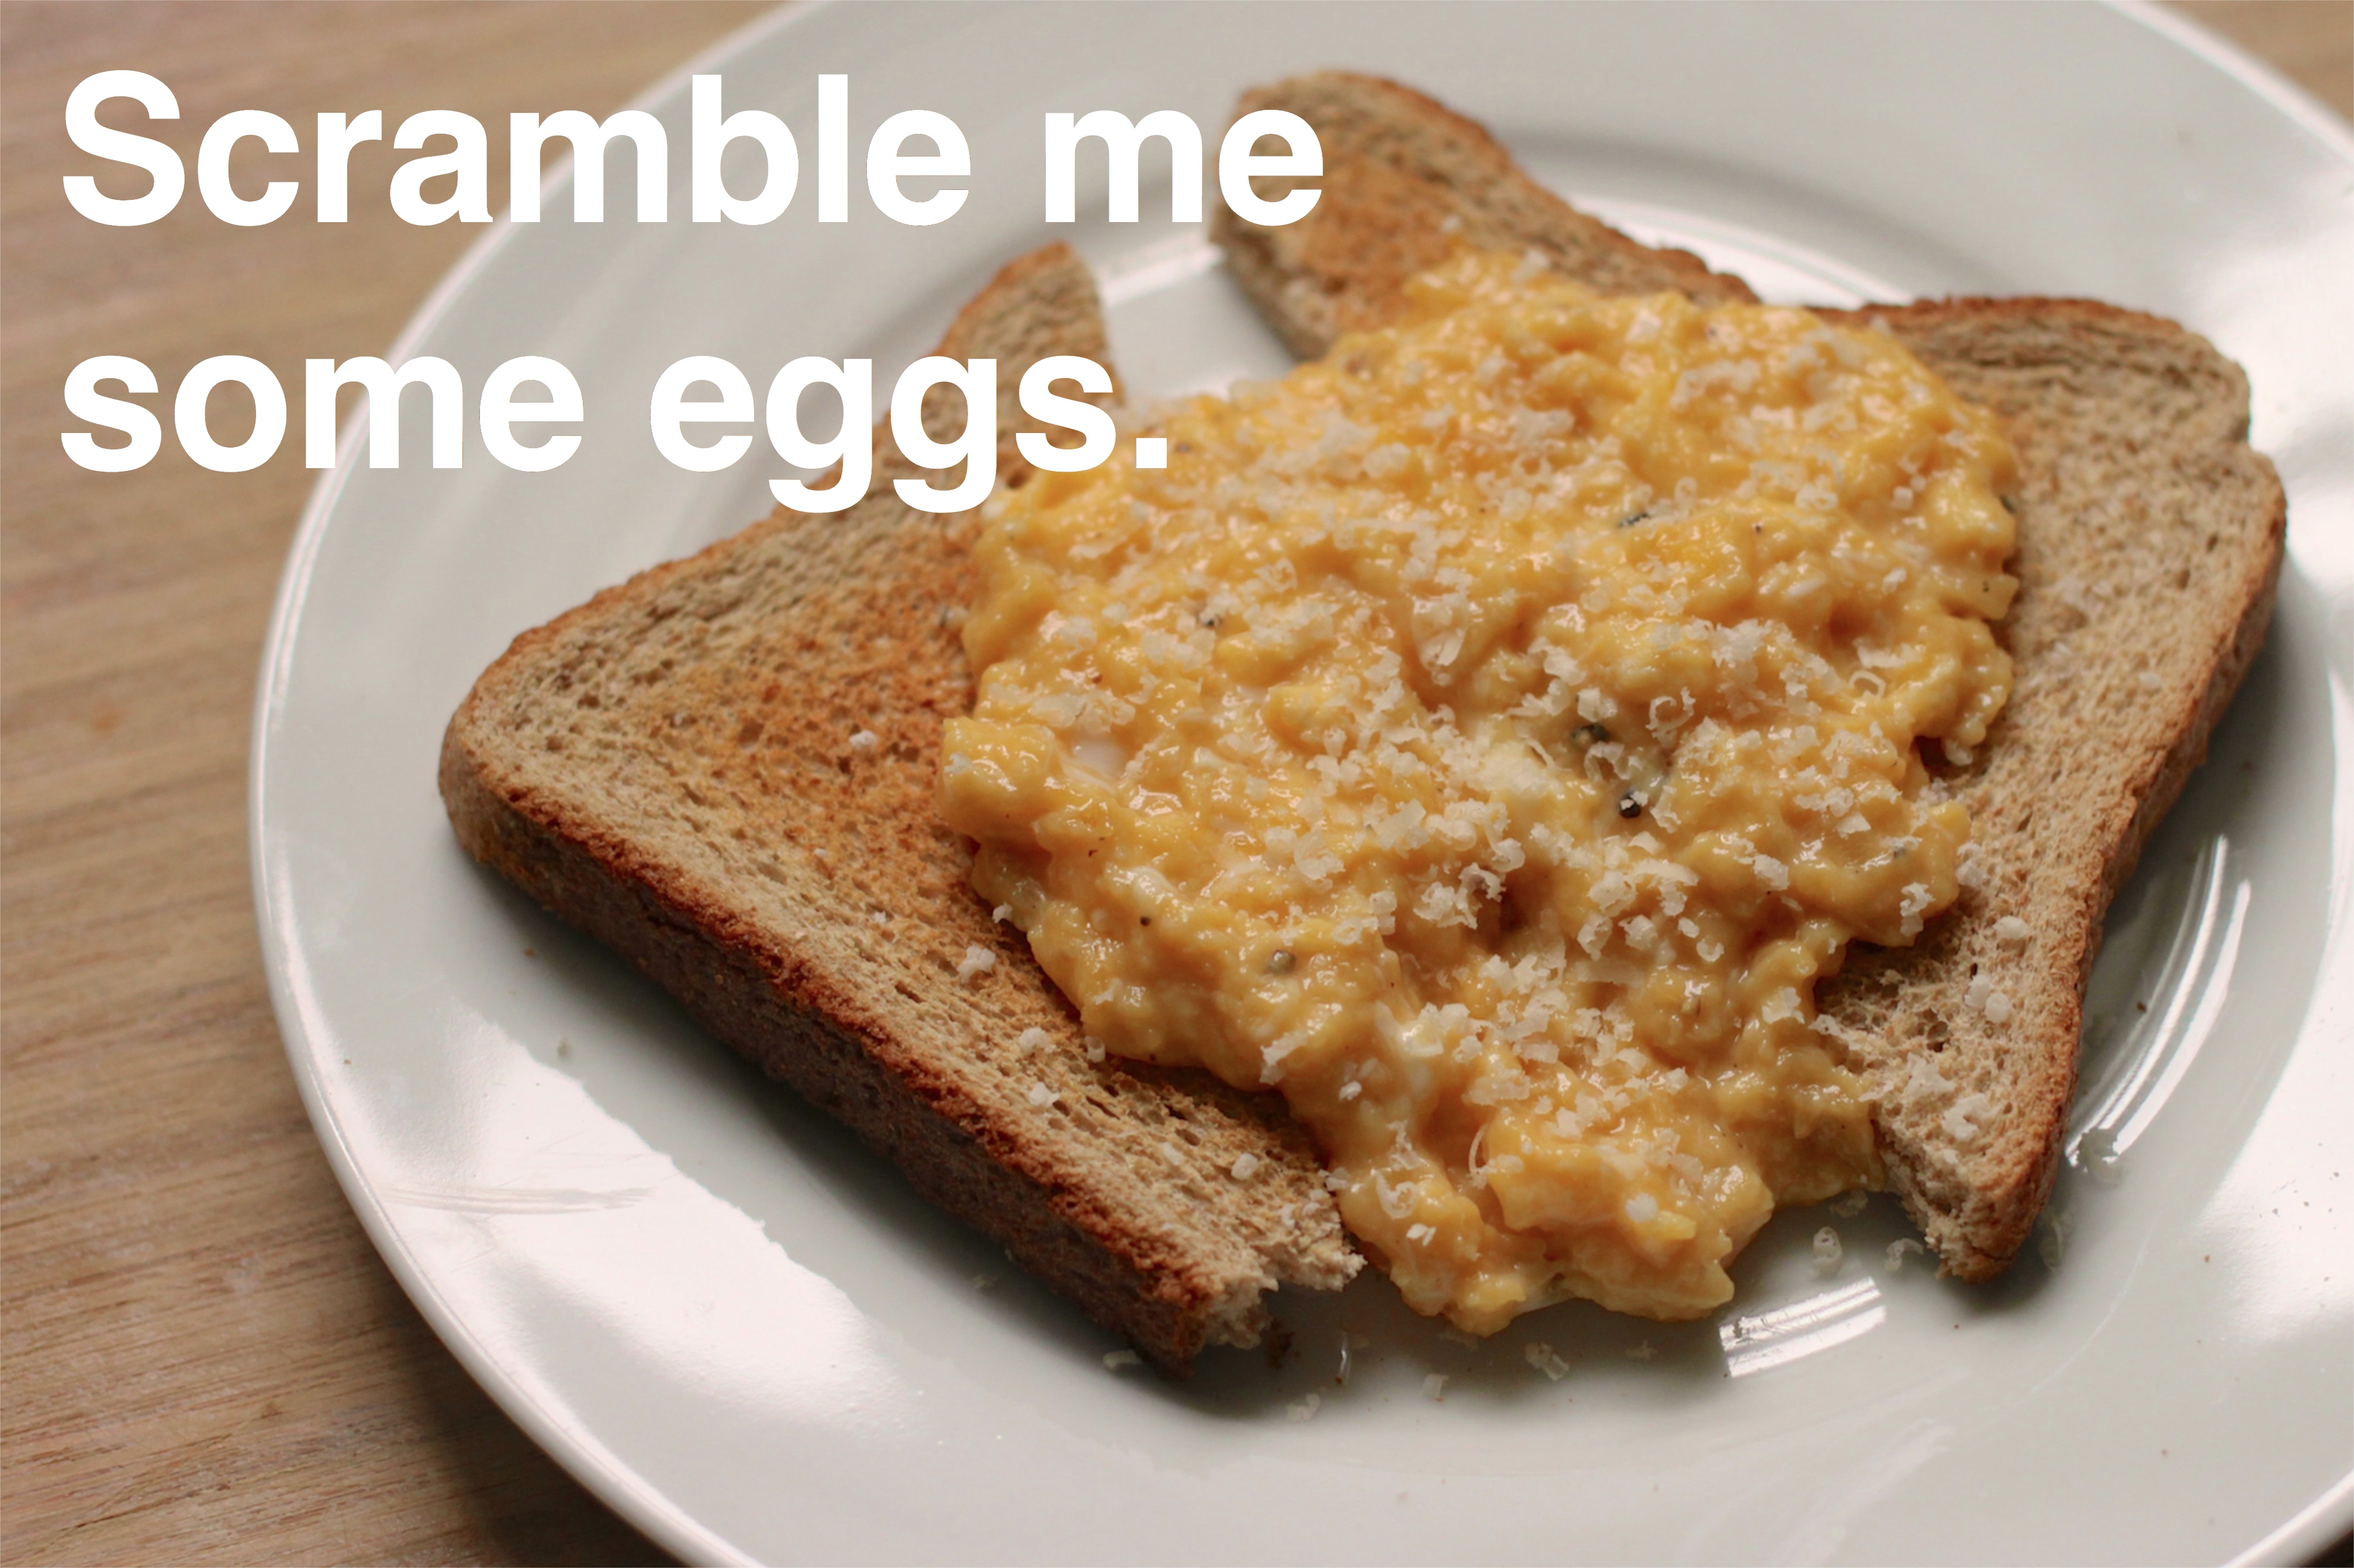
Well now I’ve found a version of scrambled eggs that I like. This is similar to the classical method of making scrambled eggs, which involves constantly whisking the eggs in a saucepan (first introduced to me by Gordon Ramsay). This method is slightly modified but the basic idea is the same. The key is lower heat, slower cooking and constant stirring. This leads to the formation of smaller curds and fluffy, creamy, almost soufflé-like eggs. I like my eggs a bit undercooked, but you can cook it a bit more if you like it that way. This is a very basic recipe but you can jazz it up with things like prosciutto, chives, smoked salmon, caramelized onions, whatever you’re feeling like. You don’t even need to add the parmigiano reggiano, that’s just a personal preference. They’re great plain too!
Here’s what you’re gonna need:
Creamy Scrambled Eggs:
- 2-3 eggs (per person if doing more than one serving)
- ~1 tbsp butter, cold
- salt and pepper
- freshly grated parmigiano reggiano (optional)
Directions:

1. Crack eggs into a small bowl. Whisk vigorously until there are no long ‘strings’ of egg white remaining. Season with salt and pepper. Add butter, cut/torn into smaller pieces, and parmigiano.

2. Pour egg mixture into a small pan (cold). Place on stove and heat at medium-low. You can use a lower heat, but it will just take longer for the eggs to cook. It will result in the eggs being more evenly cooked, though. Don’t use a higher heat, as the eggs will cook too quickly.

3. Constantly stir the eggs, using small circular motions. Occasionally scrape down the sides of the pan, if necessary. It may seem like not much is happening at first, but the eggs will eventually start to cook. It is very important to constantly stir the eggs, in order to give the smallest curds.

4. Eventually the eggs will become thicker and more evenly cooked. Once it’s just slightly undercooked (based on your preference), remove the pan from the heat, while still stirring. The eggs will still cook and reach the perfect doneness.
5. Scrape the scrambled eggs on a plate. Serve with toast or just by themselves. Enjoy!

Chinese Oxtail Stew

I don’t know who first decided to eat oxtails, but that person was a genius. Tails may at first seem to be unappetizing, but they are packed with muscle (meat and flavour!) and lots of cartilage. Cooking them slowly makes the meat tender and the cartilage becomes soft, gelatinous goodness.
 Braised oxtail dishes are found in many cuisines, ranging from Jamaican to Italian, but I’ve always found the Chinese version to be my favourite. There’s just something about all of the different flavours and the fragrant aromas. Fortunately for me, I didn’t have to look very far to find a recipe. My uncle has his own recipe, which is conveniently found in our family cookbook (do you have one of those?). This one doesn’t have as many ingredients as other recipes you may find have, but the flavour is still really good. Only a few minutes after you start braising, the kitchen becomes filled with wonderful aromas. But you must resist! It takes time (at least 3 hours in fact) for the tail meat to tenderize and for the sauce to fully develop its flavour. Once it’s done, the meat is fall-off-the-bone delicious and you’ll be gnawing at the bones to get every last bit of meat and cartilage. I also decided to add daikon radish (lo bak in Cantonese) because it’s one of my favourite Asian vegetables and it soaks up flavours really well. I served the stew over rice, which soaked up the sauce very nicely. There was a lot of meat on these tail pieces and I was stuffed and satisfied after this meal. This is definitely a go-to Chinese recipe now and you should try it out too!

Here’s what you’re gonna need:
Chinese Oxtail Stew (adapted from my uncle’s recipe):
- 2 kg oxtail, cut into 2-inch pieces
- ~1/3 cup flour
- salt and pepper
- vegetable oil
- 2 medium onions, sliced julienne
- 3 cloves of garlic, minced lightly
- 6 pieces of sliced ginger
- 5 star anise
- 2 bay leaves
- 3 cups beef broth
- 1 oz. dark soy sauce
- 2 oz. light soy sauce
- 1 daikon radish, peeled and cut into 1-inch slices
Serves four.
Usually I take photos of the cooking process, but today I was pressed for time and had to hurry in order to get everything in the oven so it would be ready for dinnertime. Sorry! I hope you enjoy the photos of the final dish, though!
Directions:
1. Preheat oven to 325°F.
2. Coat oxtail evenly with flour, salt and pepper.
3. Heat a large pan over medium-high heat and add enough oil to barely coat the bottom of the pan.
4. Place the oxtail in the pan and brown on all sides (cook about 3-4 minutes on each side). Add more oil if necessary. Don’t crowd the pan, otherwise the oxtail won’t brown evenly. You may need to do 2 batches if you have a smaller pan. Transfer the oxtail pieces to a large casserole dish or roasting pan.
5. Add the onion to the pan and sauté for a few minutes, until lightly browned. Add the garlic and ginger and cook for a few more minutes.
6. Add the star anise, bay leaves, both soy sauces and beef broth to the pan. Allow the liquid to come to a boil and pour over the oxtail. If necessary, add water to just barely cover the top of the oxtail pieces.
7. Cover with a lid or tin foil and place in the oven on the middle rack. Allow to braise for at least 3 hours.
8. After 1 hour, add the daikon to the cooking dish. Check the oxtail every half hour or so and add more water if the liquid has evaporated enough such that it is below the level of the oxtail pieces. Uncover the stew for the last half hour to allow the liquid to thicken. If it is too watery, you may pour the liquid into a pot and heat over the stove until it reaches the desired thickness.
9. Remove the stew from the oven and skim off as much fat as possible. Serve over steamed rice. Garnish with sliced green onion. Enjoy!

Chinese New Year Special: Almond Cookies!

With today being the first day of the Chinese New Year, I thought I would pay homage to my heritage and bake a cookie that is usually served around this time of the year. Now, I’m not a very traditional Chinese person but every now and then it’s nice to make something Chinese, and today seemed like the best occasion to do so. Almond cookies are very commonly served during dessert in Chinese restaurants, especially around the Chinese New Year. Usually they are a bit dry and not that exciting but I thought that I’d search for a recipe that made tasty and interesting almond cookies.
Mine turned out too crumbly and not as crunchy as I’d hoped, so next time I will tweak the recipe a bit. Perhaps I will process the ground almonds so they are finer and play around with the proportions for the ingredients. But they do like quite nice and will satisfy anyone’s cravings for Chinese cookies. Happy New Year everyone!
Here’s what you’re gonna need:
Chinese Almond Cookies (adapted from Bread et Butter):
- 100 g ground almonds
- 1 cup all-purpose flour
- 2/3 cups caster sugar
- 3/4 tsp baking powder
- 3/4 tsp baking soda
- a pinch of salt
- ~100 mL canola oil (or other flavourless oil, e.g. corn)
- 30-40 whole blanched almonds (depends how many cookies you make)
- 1 egg yolk, beaten
Directions:
1. Preheat the oven to 350°F.

2. Sift the flour, sugar, baking powder, baking soda and salt into the bowl of your stand-mixer (you can do all of the mixing by hand if you don’t have a mixer). Add the ground almonds.

3. With your mixer on medium speed (with the paddle attachment), drizzle the oil into the flour/sugar/almond mixture until the dough just begins to come together (you may need more or less). You should be able to form the dough into a ball and it shouldn’t fall apart.

4. Cover a baking sheet with parchment paper. Form the dough into ~1 inch balls. Press the balls down a bit to flatten them out a bit and place them on the baking sheet (no need to worry about spreading). The recipe should make about 30-40 cookies.

5. Press an almond into the top of each cookie.

6. Lightly brush the tops of the cookies with the egg yolk.
7. Bake for 15-20 minutes, until the tops are fairly golden and the sides of the cookies are slightly golden.
8. Remove from the oven and cool the cookies on a wire rack. Enjoy!

Blanching and Peeling Almonds

Sometimes recipes call for blanched, peeled almonds or you may need them to grind into almond flour. You could always go to the store and buy them, but if you can do something yourself, you might as well. And you might even save yourself some money in the process. Peeling almonds is super simple and it just feels more rewarding when you do something at home, all by yourself.
Directions:

1. Use plain, unsalted, shelled almonds.

2. Bring a small pot of water to a boil.

3. Boil your almonds for 60 seconds (any longer and they might soften).

4. Drain and immediately run under cold water. Dry with a paper towel.

5. You should notice that the skins have become shriveled. To remove the skins, hold an almond between your thumb and index finger and squeeze to pop out a peeled almond. Be careful; the almonds shoot out with quite some velocity (I had some shoot across the kitchen!).

6. Dry the almonds off a bit more if necessary. Use right away or store in an airtight container (up to 2 weeks).
Super Crispy Kale Chips

I’ve never been much of a heath food person, but these kale chips would definitely convert a lot of people. Kale is considered to be one of the best ‘superfoods’ out there. It contains many important nutrients and anti-cancer chemicals, plus it tastes great (though the rest of my family wouldn’t really agree). I first saw a recipe for kale chips on the local blog Small Girl Big Plate and instantly thought it was a great idea. I looked around and found many other recipes, and I was able to determine the best way to make my chips. They turned out super crispy and are sure to satisfy the occasional chip craving (though they do taste healthy). Try them out and you won’t be disappointed!

Here’s what you’re going to need:
Baked Kale Chips (super simple):
- 1 bunch of kale (I used curly kale, but I’ve heard that other varieties work too)
- 1 tbsp. extra virgin olive oil
- salt
Directions:
1. Preheat your oven to 300°F. Tear the kale leaves off of the centre ribs into chip-sized pieces. Wash the kale well with water (kale is good at trapping dirt and bugs) and dry thoroughly using a salad spinner or paper towels, etc.
2. Put the kale in a large mixing bowl and drizzle with the olive oil. Mix it well with your hands and ‘massage’ the oil into the kale leaves. If you choose, you can also add some spices to up the flavour (paprika and curry powder would work well).
3. Line 2 large baking sheets with parchment paper. Spread the kale out on the baking sheets in a single layer.


–Before and after
4. Bake the kale for about 20 minutes, turning halfway through (they shouldn’t brown at all, but should be quite crispy). Sprinkle with salt and allow to cool slightly before munching.
 –Major crunch factor
